
Where are you, ladies with fine hair? Are you having trouble with your weak, lifeless hair? Friends, I have some AMAZING ideas to make up for any hair you might not have. Since I don’t have a lot of hair to support me, I attempt to hide it all the time! Take a look at some of my simple methods for adding volume to fine hair to liven it up a bit!
1. Braid-Non-Braid
This tutorial is for those of you who claim you are incapable of braiding! Although it appears to be a braid, it isn’t! You can complete this in less than fifteen minutes once you get the feel of it.

- Start at the top of the heavier side of your parted hair. Just take two strands and knot them together! To keep it in place, insert a bobby pin. This is crucial since it will keep you organized and result in significantly less stress.
- Now, take your two knot tails, add additional hair to each tail, tie another knot with them, and fasten it with a bobby pin. Note: You will be taking these bobby pins out later, so don’t worry if you notice them or if they hurt. They aren’t necessarily staying in!
- Continue doing this exercise until you reach your ear. Girls with thicker hair, wear large sections. You will most likely have four knots at least, so don’t worry. Girls with thin hair also wear large sections. However, you’ll most likely only have three knots.
- The remaining hair should be positioned to the side of your knots. Tie everything up! For finer hair, backcomb your ponytail to make it wider; if your hair is thicker, do the same; backcombing also gives the bobby pin something to cling to!
- To form a bun, wrap it around and secure with a pin. Pro Tip: You should put your pins in the location where your fingers are holding the bun in place.
- You can begin removing the pins from the knots after everything has been fastened. Peel and spread the knots until the desired effect is achieved. Be kind. A small tug makes a big difference. Pull apart slowly.
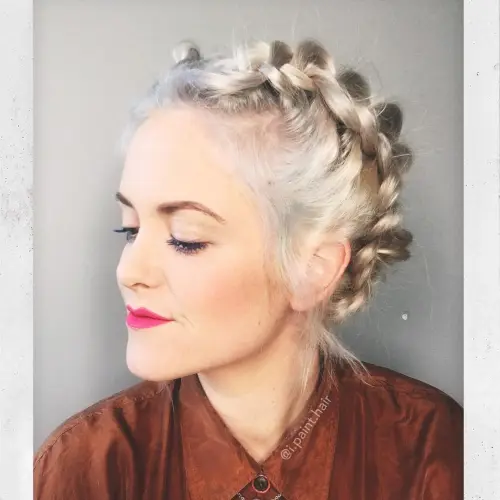
2. Braided Crown, No Flowers Needed
Do you have a bohemian vibe? Your bangs aren’t cool enough to braid anymore. But how about a crown that is braided? Yes, indeed! Rather than being strange and tight, this braid has a more romantic and natural appearance.

- Divide the front section of your hair. Tie up the remaining parts.
- Divide your hair in half lengthwise. Throw your head to one side and begin arranging your hair! As you’re going to be braiding UP, towards your part, let’s simplify things by aligning the hair in that direction.
- Proceed to braid now. Take strands and place them UNDER the center to form a French braid. In this manner, the braid will stand out and become thicker and bigger. Never forget to go big or go home, women (or gents?).
- Once your braid is complete, move to the opposite side and continue.
- At the ends, bind the tails. Gradually begin separating your braid. I find it humorous that this technique is known as pancaking. Ladies, make those braids pancake!
- Secure the tails that are buried behind your French braid by crisscrossing your braids atop your head. And voilà!
- You’re giggling now that you’ve secured it with a handy bobby pin!
- Let your hair fall naturally. Be carefree and liberated!
3. The Modern Milkmaid
You may effortlessly include this style into your weekly routine once you’ve mastered French braiding. A significant portion of my weekly go-to looks feature braids. They appear amazing, are simple, and quick. A girl could not ask for more.
- Divide your hair in half lengthwise. Did you know that it will be in the middle if you align it with your nose? Of course!
- Then begin braiding. You should place your braid beneath the center piece. The braid sits on top when you go under, which makes it easier to undo! The braid appears larger, which is another significant benefit.
- Grasp a small portion of hair each time you pass beneath the midsection. Make sure it’s as tight as you can! Though it should be tight, it doesn’t have to be perfect—we want a worn-in braid, so clumsiness is OK. Is that right?
- Give yourself a crazy high five when you’ve finished both braids! Let’s get back to work now. Begin disassembling every loop. Ascend from the base and proceed above!
- Pull the strands to the side and secure with pins in the back.
- Take advantage of any fancy money-shot features you have, like sideburns, neck hair, or baby hair!
Make it uniquely yours by adding glitter to those roots, donning a flower crown, or donning a jaunty cap!
4. These-Ain’t-Your-Mama’s-Rolls
Unaware of how to braid? No worries, I’ve got you covered! Do you recall the ’90s topsy turvy games? Yes, they have returned! Additionally, this is the hairstyle that gives fine hair more volume!
- As usual, having some texture in your hair will be beneficial. Reluctant to take a bath today? Exactly! Let’s make good use of those organic oils. It is also OK if you are clean. Simply use some dry shampoo on yourself. Whoa.
- Select any portion! Divide the area between your temple and the top of your mane. Do you recall the topsy turvy? Make a hole in the ponytail, secure it loosely, and loop the elastic through. Slightly tighten it.
- Next, extend the part from the back of your head to the circle around your ears. And topsy turvy, too. Pull them in tight.
- Repeat everything on the opposite side. Gently pull apart the topsy-turvy ties to loosen them.
- Gather the two ends and secure them at the back. This serves as your roll’s basis.
- Gather the leftover hair and wrap it around the back of your tie. When there is no more hair to wrap up, keep rolling it around and around. Then, secure it with a few pins.
- Show off your money facial hair, sideburns, and neck fur. Whatever suits you!
5. Panda Puffs
Rabbit bunny? Pancake puffs? I have them, and you can have them, whatever you choose to name them! These are far cuter than mini-space buns!

- Take out those haphazard extensions you purchased but never used. We require more for these adorable bundles.
- Place a tiny quantity of hair where you want the puff to land with a bobby pin. I only used a single small bunch. To prevent the band in the extension from becoming very bulky, you should use a little one.
- Pull your hair back and bind with an elastic band to form a ponytail that reaches your top ear. Your lot needs to be tucked away in the ponytail!
- Repeat everything on the opposite side.
- Backcomb the ponytails’ undersides. In order to hide said backcombing, just smooth over!
- To create a puff, fold. Gather the remaining hair and wrap it around the base of the ponytail. A bobby pin will help hold everything in place.
6. Glam Waves
Who wouldn’t want to look like a Hollywood glam girl for a day? None of these can be resolved quickly. It’s such a dapper appearance, damn it! Allow yourself 20 to 30 minutes, according on how thick your hair is.

- Verify that you’ve previously styled your hair in the manner you choose. For instance, you’ll need to hose yourself down and blow-dry your hair in the desired direction if you wore your hair in the center that day but wanted a dramatic side part.
- Divide your hair in half, leaving half in the front and the other half in the back, starting at the top of your head and ending at the back of your ears. In order to keep it out of your way, secure the rear.
- Before curling each piece of hair, spray it (I used @lorealpro constructor).
- Take a 1″–2″ section and curl it until it’s thoroughly heated; if it’s HOT to the touch, it’s done. I think I burned myself three times or more. Avoid doing that. Release the curl and leave it inside to cool. You wish to see past that.
- Comply with your portion and repeat the process on the opposite end.
- Proceed with the back. Ensure that each one is firmly anchored. It aids in maintaining volume and setting your curl.
- Give your sausage rolls time to cool! You look so ridiculous. This is the ideal chance to snap a photo of this strange construction. I prefer to apply my makeup at this moment. Additionally, the curls will be cool by the time you’re through with your makeup and photo shoot.
- Remove your pins and give it a thorough brushing. Continue brushing until every curl merges into one. Play around and arrange them as you see fit. Lastly, use hairspray to thoroughly clean yourself.
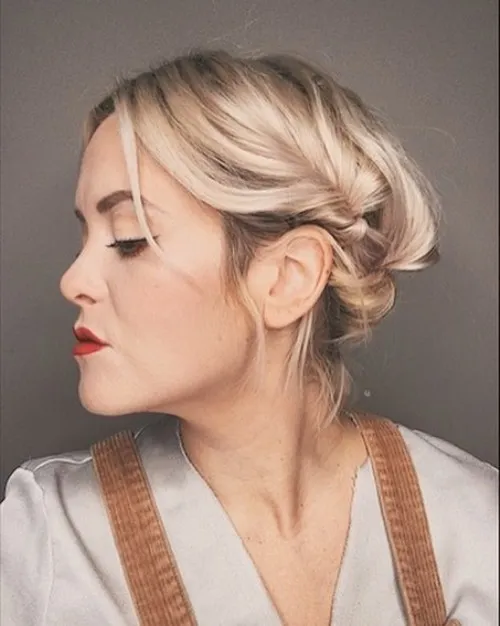
7. Twisted Romantic Updo
The simplest of all hairstyles to give fine hair volume. You don’t have a lot of hair, I see. You can still rock this look if you have long enough hair to hide your breasts or a bob cut. This hairstyle is not limited to any certain group!

- Starting from the sides of your hair, pin up half of it in the back. Since your pins will serve as the foundation and focal point of your look, crisscross them.
- Just twist, starting from one side, by your ear! Place it on top of the pins you previously used. Secure the twist with a pin! We’re going to use the remaining tails in the following round, so let them rest.
- Take a segment from the opposite side and repeat the process, adding the tails from the final twist. Twist to the rear and fasten firmly.
- Repeat now, twisting, overlapping, pinning, and moving side to side.
- The small bit of hair around the nape of your neck will remain after all of your sides have been twisted and pinned. To create a delicate chignon, tuck it in and pin it in place.
Products and Tools You’ll Need
- tiny, transparent hair elastics;
- bobby pins
- your preferred hair straightener or curling iron, based on the type of waves you like;
- Pret-a-powder by Bumble and Bumble is a dry shampoo/texturizer that holds and “puffs” up your knots;
- Use Bumble and Bumble’s Strong Finish Hairspray to make sure your appearance lasts all day;
- For simpler styling, choose L’Oreal Pro Constructor.
